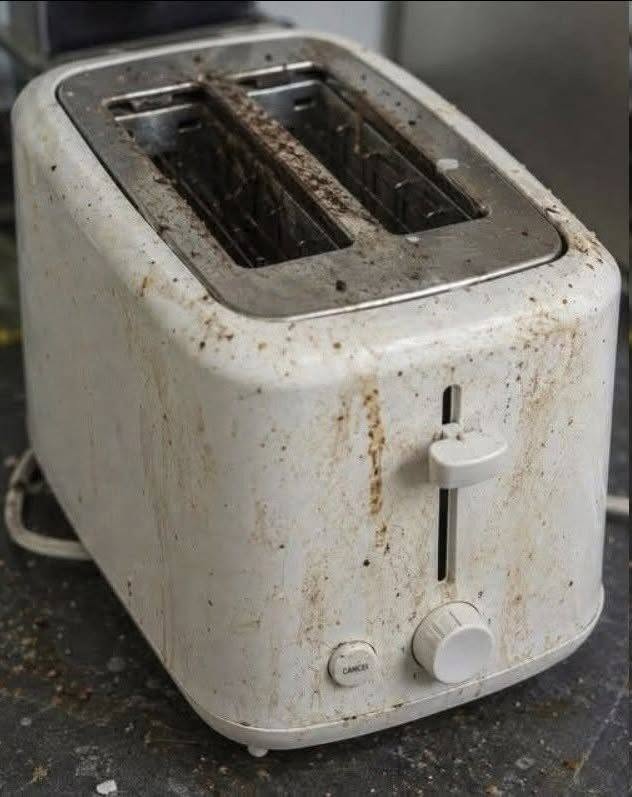
You walk into the kitchen and notice that your once-clean toaster is now covered in grease, stains, burnt crumbs, fingerprints, and mysterious brown marks.
Your first instinct may be to grab a sponge, spray it with your strongest kitchen cleaner, and start scrubbing.
But a toaster isn’t like an ordinary countertop appliance.
It contains electrical components and delicate heating elements, which means cleaning it incorrectly can damage the appliance or create an electrical or fire hazard.
The good news is that even a very dirty toaster can often be dramatically improved with a few simple cleaning steps.
Why Toasters Get So Dirty
A toaster may look like a simple appliance, but every slice of bread leaves something behind.
Over time, tiny crumbs fall into the bottom and accumulate around the crumb tray.
The outside can also collect:
- Cooking grease
- Dust
- Fingerprints
- Food splashes
- Oil
- Sticky residue
If the toaster sits close to the stove, grease can build up surprisingly quickly.
And the longer that grime stays there, the harder it becomes to remove.
The Hidden Problem Is Often Inside
The dirty exterior may look terrible, but the crumbs hidden inside deserve even more attention.
Old crumbs can repeatedly heat up every time you use the toaster. Excessive crumb buildup can contribute to burning smells, smoke, and potentially increase fire risk.
That’s why cleaning the crumb tray isn’t just about appearance.
It’s basic toaster maintenance.
Before Cleaning: UNPLUG THE TOASTER ⚠️
This is the most important step.
Never clean a toaster while it is plugged in.
Disconnect it from the electrical outlet and allow it to cool completely before touching the interior or removing parts.
Even if the toaster hasn’t been used recently, unplug it anyway.
Don’t rely only on the toaster’s lever or controls.
What You’ll Need
For a basic deep clean, gather:
- Microfiber cloth
- Soft sponge
- Mild dish soap
- Warm water
- Small soft brush or clean pastry brush
- Old soft toothbrush
- Dry towel
- Trash bin or sink for crumbs
You don’t need a collection of powerful chemicals.
In fact, aggressive cleaners can sometimes damage the appliance’s finish.
Step 1: Remove the Crumb Tray
Most modern pop-up toasters have a removable crumb tray near the bottom.
It may slide out from the front, side, or back depending on the model.
Pull it out carefully.
You may be surprised by what’s inside.
Old crumbs, burnt pieces of bread, seeds, and other debris can accumulate there.
Empty everything into the trash.
Wash the Tray Separately
If your manufacturer’s instructions allow it, wash the removable crumb tray with warm water and a little dish soap.
Use a soft sponge to remove grease and stuck-on residue.
Then rinse it.
Most importantly, let it dry completely.
Don’t put a wet crumb tray back into an electrical appliance.
Step 2: Remove Loose Crumbs
Once the crumb tray is removed, there may still be crumbs trapped inside.
With the toaster unplugged and completely cool, you may be able to gently tip it over a trash bin and allow loose crumbs to fall out.
Don’t violently shake or bang the toaster.
Some models have delicate internal components that can be damaged.
Always follow your toaster manufacturer’s instructions if they differ.
Step 3: Use a Soft Brush
A small, clean, dry brush can help loosen crumbs that remain around accessible areas.
A pastry brush or another soft, non-metallic brush can work well.
The goal is to move loose crumbs, not scrub the heating elements.
Be gentle.
Never Stick a Knife Inside the Toaster 🚫
This is one of the most important toaster safety rules.
Don’t insert:
Knives
Forks
Metal skewers
Screwdrivers
or other metal utensils into the slots.
Metal objects can damage the heating elements and create an electrical hazard.
Even when the toaster is unplugged, you don’t want to bend, break, or damage delicate internal components.
If bread becomes stuck during normal use, unplug the toaster and let it cool before attempting safe removal according to the manufacturer’s instructions.
Step 4: Clean the Exterior
Now you can tackle the ugly stains visible in the photo.
Prepare a small amount of warm water with a drop or two of mild dish soap.
Dip a microfiber cloth into the solution and wring it out extremely well.
The cloth should be:
Damp — not dripping wet.
Gently wipe the outside of the toaster.
Dish soap is particularly useful for greasy kitchen residue.
Don’t Spray Cleaner Directly Onto the Toaster
This is another common mistake.
Don’t spray cleaning solution directly over the toaster.
Liquid can run into:
Slots
Controls
Switches
Electrical components
or ventilation openings.
Instead, apply a small amount of appropriate cleaner to your cloth first, then wipe the exterior.
How to Remove Stubborn Grease
If the toaster has been sitting beside a stove for months, ordinary wiping may not immediately remove everything.
Start with warm water and mild dish soap.
Allow the damp cloth to rest briefly against stubborn greasy areas, provided you’re keeping moisture away from openings and controls.
Then wipe again.
You may need several passes.
Avoid assuming that stronger chemicals are always better.
What About Baking Soda?
Baking soda is often recommended online for virtually every cleaning problem.
But toaster finishes vary.
Baking soda is mildly abrasive and can potentially affect certain finishes if rubbed aggressively.
Some appliance manufacturers specifically advise against abrasive cleaning products.
So don’t automatically cover the entire toaster in baking-soda paste.
Check the manufacturer’s cleaning instructions first.
If you’re uncertain about a product, test it on a small inconspicuous exterior area.
What About Vinegar?
Vinegar is another extremely popular internet cleaning ingredient.
But it isn’t automatically appropriate for every toaster finish.
Acidic cleaners can affect certain metals or coatings.
Again, the manufacturer’s instructions should take priority over viral cleaning hacks.
For many dirty toaster exteriors, mild dish soap and a soft damp cloth are enough.
Don’t Pour Water Into the Slots 💧
A toaster is an electrical appliance.
Never pour:
Water
Soapy water
Vinegar
Disinfectant
or other cleaning liquids into the bread slots.
And never immerse the entire toaster in a sink full of water.
Internal moisture can damage electrical components and create a dangerous situation when the appliance is later plugged in.
Don’t Scrub the Heating Elements
Look inside a toaster and you’ll see delicate heating components.
Leave them alone.
Don’t scrub them with a sponge.
Don’t scrape them with a knife.
Don’t spray cleaner on them.
Don’t bend them.
If something is badly stuck to an internal heating component and cannot be safely removed using the manufacturer’s recommended method, professional repair or replacement may be safer than aggressive DIY cleaning.
Clean Around the Controls Carefully
Knobs, buttons, and levers often collect grease.
Use a soft, barely damp cloth to clean around them.
For tight exterior areas, a cotton swab or soft brush may help, provided no moisture is allowed to enter electrical openings.
Then wipe everything dry.
Don’t Forget the Bottom
The underside of the toaster can collect:
Crumbs
Dust
Grease
and kitchen debris.
Once the appliance is unplugged and cool, inspect the bottom carefully.
Clean accessible exterior areas without allowing moisture into openings.
Let Everything Dry Completely
This step is easy to underestimate.
After cleaning:
Don’t immediately plug the toaster back in.
Make sure the exterior is dry.
Make sure the crumb tray is completely dry.
Make sure no moisture has entered the appliance.
Only reassemble and use the toaster once everything is properly dry.
When Cleaning Isn’t Enough
A toaster can become dirty without being unsafe.
But some signs indicate that you may have a bigger problem.
Stop using the toaster if you notice:
Damaged electrical cord
Cracked plug
Melted plastic
Significant scorch marks
Sparks
Persistent smoke
Electrical burning smell
Buzzing or crackling
Circuit breakers repeatedly tripping
These aren’t ordinary cleaning problems.
The appliance may need professional inspection or replacement.
What If It Smells Burnt?
A burnt smell can sometimes come from accumulated crumbs.
That’s why emptying the crumb tray is important.
But if the smell continues after accessible crumbs have been safely removed—or if the smell seems electrical rather than food-related—stop using the toaster.
Don’t assume every burning smell is just old bread.
What If the Toaster Smokes?
A tiny amount of smoke from a trapped burnt crumb isn’t the same as persistent smoke coming from an appliance.
If your toaster produces unexplained or persistent smoke, unplug it if it is safe to do so and stop using it.
Investigate the cause before plugging it back in.
Never Use Water on an Electrical Fire ⚡🔥
If an electrical appliance catches fire, don’t pour water over it.
If it is safe to disconnect the electricity, do so.
Move away from danger and contact emergency services when necessary.
Never put yourself at risk trying to save a small appliance.
How Often Should You Clean Your Toaster?
You shouldn’t wait until it looks like the one in the picture.
If you use your toaster frequently, check the crumb tray regularly.
For a household using the toaster every day, emptying accumulated crumbs roughly weekly—or more frequently when necessary—is a sensible habit.
The exterior can be wiped whenever grease or food splashes appear.
Regular maintenance is much easier than trying to remove months of hardened grime.
A 5-Minute Maintenance Routine
Once the toaster is clean, maintaining it is simple.
Every few uses:
1. Unplug it.
2. Allow it to cool.
3. Check the crumb tray.
4. Empty accumulated crumbs.
5. Wipe visible exterior stains.
6. Keep it dry.
This can prevent the toaster from ever reaching the condition shown in the viral photo.
Keep Your Toaster Away From Grease
If possible, don’t position the toaster immediately beside a frying pan or stovetop.
Airborne grease can gradually settle on the appliance.
Moving the toaster slightly farther away from active cooking areas can reduce buildup considerably.
Don’t Store Things on Top of the Toaster
Some people use the toaster as an extra shelf.
That’s not a good habit.
Avoid placing:
Paper
Plastic containers
Kitchen towels
Bread bags
or other combustible objects on or directly around a toaster.
The appliance produces significant heat during operation.
Keep the area around it clear.
Don’t Toast Inappropriate Foods
A standard pop-up toaster is designed primarily for appropriate bread products.
Be careful with foods containing large amounts of:
Butter
Oil
Cheese
Frosting
or fillings that can melt and drip.
Grease and melted ingredients can fall toward heating components and increase smoke or fire risk.
Use an appliance specifically designed for those foods when appropriate.
Never Leave a Toaster Unattended for Long
A toaster operates at very high temperatures.
Stay nearby while it’s operating.
If bread becomes stuck and begins burning, you want to notice immediately.
Regular cleaning combined with sensible supervision makes toaster use much safer.
What About Stainless Steel Toasters?
If your toaster has a stainless-steel exterior, fingerprints and grease can make it look particularly dirty.
Start with mild dish soap and a soft damp cloth.
Wipe gently.
Then dry with a clean microfiber cloth.
If you choose a stainless-steel cleaning product, make sure it is appropriate for your appliance and keep it away from the slots and controls.
Never assume every metallic-looking toaster is bare stainless steel.
Some appliances have coatings that can be damaged by abrasive cleaners.
Avoid Steel Wool
It may seem perfect for stubborn grime, but steel wool can scratch many appliance finishes.
Once the surface is scratched, restoring the original appearance can be difficult.
Start with the least abrasive cleaning method possible.
The Biggest Cleaning Mistakes 🚫
When dealing with a filthy toaster, avoid these common mistakes:
Cleaning while it is plugged in
Pouring water into the slots
Submerging the toaster
Spraying cleaner directly into the appliance
Using knives or forks inside
Aggressively scrubbing heating elements
Using harsh chemicals without checking compatibility
Putting a wet crumb tray back inside
Plugging the toaster in before everything is completely dry
Ignoring damaged cords, sparks, smoke, or electrical smells
A Simple Deep-Cleaning Checklist
If your toaster looks like it hasn’t been cleaned in years, follow this order:
1. Unplug it.
2. Let it cool completely.
3. Remove and empty the crumb tray.
4. Wash the removable tray if permitted.
5. Let the tray dry completely.
6. Gently remove loose crumbs.
7. Use a soft, dry, non-metallic brush for accessible debris.
8. Wipe the exterior with a soft, slightly damp cloth and mild dish soap.
9. Carefully clean around knobs and controls.
10. Dry the exterior thoroughly.
11. Reassemble only when every removable component is completely dry.
12. Inspect the cord, plug, and appliance for damage before using it again.
Should You Clean It or Replace It?
Sometimes an extremely dirty toaster simply needs a good cleaning.
But there’s a point where replacement makes more sense.
Consider replacing or professionally assessing the appliance if you find:
Severe corrosion
Damaged electrical wiring
A cracked or melted casing
Repeated sparking
Persistent electrical burning smells
Heating elements that appear damaged
or
Repeated electrical faults.
A cheap toaster isn’t worth risking an electrical accident over.
The Bottom Line 🍞✨
A filthy toaster may look hopeless, but you usually don’t need an aggressive chemical cocktail to clean it.
The safest approach is surprisingly simple:
Unplug → cool → empty crumbs → gently brush → clean removable parts → wipe the exterior → dry completely.
The most important rule is keeping water, cleaning products, and metal utensils away from the toaster’s internal electrical and heating components.
Regularly emptying the crumb tray also does more than make your toaster look clean—it helps reduce the buildup of burnt food that can contribute to smoke, odors, and fire risk.
So if someone leaves your toaster looking like the one in the photo, don’t immediately throw it away.
Give it a careful, safe cleaning first.
You might be surprised by how much better it looks afterward.