Craving something rich, chocolatey, and delicious without turning on the oven? These homemade chocolate ice cream bars are a wonderfully simple treat you can prepare with just a handful of ingredients!
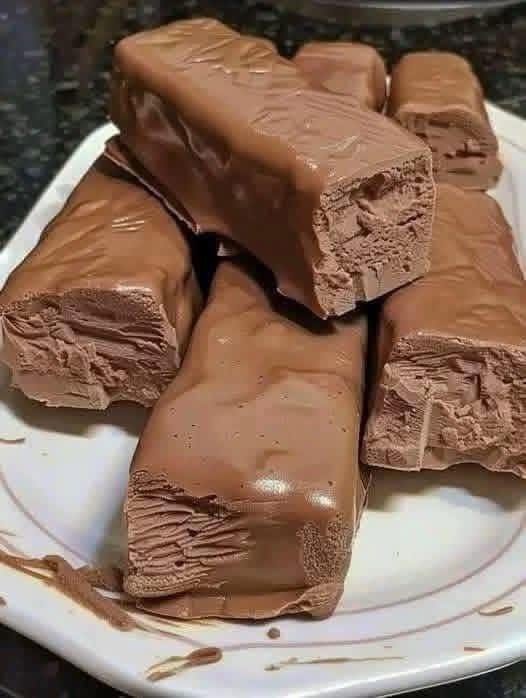
If you’ve seen the viral picture of thick, creamy chocolate bars stacked on a plate, you probably wondered how to make something so tempting at home.
The best part? You don’t need flour, eggs, an ice cream machine, or complicated baking techniques.
These frozen chocolate bars have a smooth, mousse-like center and a delicious chocolate coating that makes every bite feel indulgent.
They’re perfect for warm afternoons, family desserts, weekend treats, or whenever you’re craving chocolate.
And although some social media posts describe desserts like these as “zero-carb” foods that you can eat without limits, the truth is a little different.
This recipe is flourless and can be made lower in added sugar, but it isn’t necessarily carb-free or suitable for unlimited consumption.
Let’s make these irresistible chocolate ice cream bars!
Why You’ll Love These Homemade Chocolate Bars
There are so many reasons to try this easy frozen dessert.
- No flour required: Perfect when you want a flourless treat.
- No baking: Your freezer does most of the work.
- Rich chocolate flavor: Chocolate lovers will appreciate the creamy filling and crisp coating.
- Simple ingredients: Everything is easy to find.
- Customizable sweetness: Choose regular chocolate or lower-sugar alternatives.
- Make-ahead friendly: Prepare a batch and enjoy it throughout the week.
- Great for sharing: Serve them as individual dessert bars.
They look impressive but are surprisingly easy to prepare.
Recipe Overview
<text></text>
| Detail | Information |
|---|---|
| Preparation time | 20 minutes |
| Freezing time | 4–6 hours |
| Total time | About 4½–6½ hours |
| Servings | 8 bars |
| Difficulty | Easy |
| Baking required | No |
| Flour required | No |
Ingredients for Homemade Chocolate Ice Cream Bars
This recipe makes approximately eight medium-sized bars.
For the Creamy Chocolate Filling
- 1½ cups (360 ml) cold heavy whipping cream
- ½ cup (120 g) full-fat cream cheese, softened
- ¼ cup (25 g) unsweetened cocoa powder
- ⅓ cup (45 g) powdered sugar, or an appropriate powdered sweetener alternative
- 1 teaspoon vanilla extract
- A small pinch of salt
For the Chocolate Coating
- 200 g (7 oz) dark or milk chocolate, chopped
- 2 tablespoons coconut oil or another neutral-tasting oil suitable for chocolate coating
Optional Additions
- 2 tablespoons finely chopped toasted hazelnuts
- 1 tablespoon sugar-free chocolate chips
- A pinch of cinnamon
- A few drops of peppermint extract
- A tablespoon of smooth peanut butter
The coating is optional, but it creates the glossy chocolate shell that makes the bars look especially delicious.
How to Make Chocolate Ice Cream Bars Step by Step
Step 1: Prepare the Cream Cheese Mixture
Place the softened cream cheese in a large mixing bowl.
Beat it with an electric mixer until smooth and creamy.
Add the cocoa powder, powdered sugar or sweetener, vanilla extract, and salt.
Continue mixing until the ingredients are fully combined.
The mixture should look thick, smooth, and chocolatey.
If you’re using a granulated sugar substitute, choose one designed to dissolve smoothly in cold desserts. Some alternatives can produce a gritty texture.
Step 2: Whip the Cream
Pour the cold heavy whipping cream into a separate bowl.
Using an electric mixer, beat until soft-to-medium peaks form.
The cream should hold its shape while remaining smooth.
Avoid overwhipping, which can cause the cream to become grainy.
Step 3: Combine the Mixtures
Add about one-third of the whipped cream to the chocolate cream cheese mixture.
Fold gently with a spatula to lighten the mixture.
Add the remaining whipped cream in two portions, folding carefully until combined.
The goal is to maintain as much air as possible.
This helps create a lighter, creamier frozen texture.
Step 4: Shape the Bars
Line a small rectangular baking dish or loaf pan with parchment paper.
Spread the chocolate mixture evenly into the prepared dish.
Aim for a thickness of approximately 1½ inches (4 cm).
Smooth the top with a spatula.
Alternatively, divide the mixture among silicone bar molds for more uniform portions.
Step 5: Freeze Until Firm
Cover the dish and place it in the freezer.
Freeze for at least 4–6 hours, or until completely firm.
For the cleanest cuts, freezing overnight works particularly well.
Step 6: Cut Into Bars
Remove the frozen chocolate mixture from the dish using the parchment paper.
Place it on a cutting board.
Using a sharp knife, cut into eight rectangular bars.
If the mixture becomes too soft, return it to the freezer for 15–20 minutes before continuing.
Step 7: Prepare the Chocolate Coating
Place the chopped chocolate and coconut oil in a microwave-safe bowl.
Heat in 20-second intervals, stirring between each interval.
Continue until the chocolate is smooth and fully melted.
Alternatively, melt the chocolate over a gentle double boiler.
Let it cool until lukewarm but still fluid.
Do not pour very hot chocolate over the frozen bars.
Step 8: Coat the Frozen Bars
Working quickly, dip each frozen bar into the melted chocolate.
You can use two forks to lift and turn each bar.
Allow excess chocolate to drip off.
Place the coated bars onto a parchment-lined tray.
The cold filling should help the chocolate coating set quickly.
Step 9: Freeze Again
Return the coated bars to the freezer for approximately 15–30 minutes.
Once the coating is firm, the bars are ready to enjoy.
The Secret to a Creamy, Smooth Texture
Homemade frozen desserts sometimes become icy or overly hard.
A few simple techniques can help improve the result.
Use Full-Fat Ingredients
Heavy whipping cream and full-fat cream cheese help create a rich, creamy texture.
Lower-fat substitutions can increase the likelihood of an icy or less satisfying result.
Whip the Cream Properly
Whipped cream incorporates air into the filling.
This helps prevent the frozen mixture from becoming an overly dense block.
Don’t Overmix
Once the whipped cream is added, fold gently.
Aggressive mixing can deflate the cream and affect the final texture.
Use a Good-Quality Cocoa Powder
Unsweetened cocoa powder provides the chocolate flavor without adding extra sugar.
Dutch-process cocoa creates a smoother, darker flavor, while natural cocoa offers a slightly sharper chocolate taste.
Both can work.
Let the Bars Soften Briefly
These bars can become quite firm in a household freezer.
Let them stand at room temperature for about 3–5 minutes before eating, depending on their size and your room temperature.
This allows the center to soften slightly.
Can You Make These Chocolate Bars Without Sugar?
Yes, you can reduce or replace the added sugar.
Powdered erythritol, allulose-based sweeteners, or other suitable sugar alternatives may work, although their effects on texture and sweetness vary.
For a lower-added-sugar version:
- Replace the powdered sugar with a suitable powdered sweetener.
- Choose chocolate with little or no added sugar.
- Use unsweetened cocoa powder.
- Avoid sweetened toppings.
Keep in mind that sugar substitutes can affect freezing behavior.
Some may make the dessert harder, while others help it remain softer.
And even with no added sugar, the dessert still contains naturally occurring carbohydrates from dairy and cocoa.
Are These Bars Really Zero-Carb?
No.
Despite what some viral posts suggest, most homemade chocolate bars are not completely free of carbohydrates.
Heavy cream, cream cheese, cocoa powder, and chocolate all contain varying amounts of carbohydrates.
Even sugar-free chocolate can contain carbohydrates.
The exact amount depends on the ingredients and serving sizes.
Can You Eat as Much as You Want?
Not necessarily.
These bars are rich in fat and calories, especially when made with heavy cream and chocolate.
A dessert can be flourless or lower in sugar while still being energy-dense.
Portion size matters, particularly for people monitoring calorie intake or managing blood glucose.
Enjoying one bar as an occasional dessert is a more balanced approach than treating the recipe as an unlimited food.
Five Delicious Variations to Try
1. Chocolate Peanut Butter Bars
Add one tablespoon of smooth peanut butter to the chocolate filling.
Swirl it gently through the mixture before freezing.
The result is a delicious combination of chocolate and nutty flavor.
2. Chocolate Hazelnut Bars
Mix finely chopped toasted hazelnuts into the filling.
Sprinkle additional nuts over the chocolate coating before it sets.
This creates a pleasant crunch.
3. Mint Chocolate Bars
Add a tiny amount of peppermint extract to the filling.
Start with just a drop or two because peppermint extract can be very strong.
4. Mocha Chocolate Bars
Dissolve one teaspoon of instant coffee in one teaspoon of warm water.
Allow it to cool, then add it to the cream cheese mixture.
The coffee enhances the chocolate flavor.
5. Double Chocolate Crunch Bars
Add a small handful of miniature chocolate chips to the filling.
Coat the frozen bars in dark chocolate for an extra-rich dessert.
How to Make the Bars Look Like the Viral Photo
The viral image shows thick chocolate bars with a smooth exterior and a dense, airy-looking chocolate center.
To achieve a similar appearance, focus on three details.
First, make the filling thick. Spread it into a relatively small dish so the bars have height rather than resembling thin ice cream sandwiches.
Second, freeze the filling completely before cutting. A firm center makes it easier to create neat rectangular shapes.
Third, use a thin chocolate coating. A thin shell produces a cleaner finish and a satisfying snap.
The exact appearance will vary depending on your ingredients and freezing method.
Common Mistakes to Avoid
Mistake 1: Using Warm Cream
Heavy cream whips best when cold.
Warm cream may not develop the volume needed for a light filling.
Mistake 2: Not Softening the Cream Cheese
Cold cream cheese can create lumps.
Allow it to soften before mixing, but do not leave it unrefrigerated for an extended period.
Mistake 3: Adding Hot Chocolate to the Frozen Bars
Hot coating can melt the filling.
Allow the melted chocolate to cool slightly before dipping.
Mistake 4: Cutting Before Fully Frozen
Partially frozen filling can smear or lose its shape.
Wait until the mixture is firm.
Mistake 5: Using Too Much Cocoa Powder
Extra cocoa can make the filling bitter or powdery.
Follow the recommended amount and adjust gradually.
Mistake 6: Storing the Bars Uncovered
Frozen desserts can absorb odors and develop freezer burn.
Store the bars in an airtight container.
How to Store Homemade Chocolate Ice Cream Bars
Once the chocolate coating is completely set, transfer the bars to an airtight freezer-safe container.
Separate layers with parchment paper to prevent sticking.
For the best flavor and texture, enjoy them within approximately 2–3 weeks.
Keep them frozen until shortly before serving.
Avoid repeated thawing and refreezing, which can damage the texture and affect food safety.
Can You Make These Bars Ahead of Time?
Absolutely!
This recipe is ideal for preparing in advance.
You can make the filling the day before serving and freeze it overnight.
The next day, cut the bars and add the chocolate coating.
Once the coating sets, the bars can remain in the freezer until you’re ready to enjoy them.
They’re a convenient option for parties, family gatherings, or homemade dessert meal preparation.
Frequently Asked Questions
Can I make these bars without flour?
Yes! This recipe is completely flourless.
Do I need an ice cream maker?
No. An electric hand mixer is helpful, but you don’t need an ice cream machine.
Can I make these bars with only three ingredients?
You can create a simplified frozen chocolate dessert with heavy cream, melted chocolate, and a sweetener, although the texture and flavor will differ from this recipe.
Are these chocolate bars keto-friendly?
They can be adapted for some low-carbohydrate eating plans by choosing appropriate sweeteners and chocolate. However, the carbohydrate content must be calculated from the actual ingredients.
Can I use milk instead of heavy cream?
Ordinary milk cannot be whipped like heavy cream and will produce a much icier texture. It is not a direct substitute.
Why are my bars too hard?
Homemade frozen desserts can become very firm, particularly when they contain less sugar. Allow them to soften briefly before serving.
Can I use white chocolate?
Yes, but white chocolate contains different amounts of sugar and cocoa butter, so the sweetness and texture will change.
Can I make them without cream cheese?
Yes, although you would need to adjust the proportions. A traditional no-churn ice cream base made with whipped cream and sweetened condensed milk is another option.
Can children enjoy these bars?
Yes, provided the ingredients are appropriate for their age and dietary needs. Be mindful of allergies and portion sizes.
How long do the bars last in the freezer?
For best quality, enjoy them within approximately two to three weeks when stored in an airtight freezer-safe container.
Final Thoughts: A Chocolate Lover’s Dream Without Baking
These homemade chocolate ice cream bars prove that you don’t need flour, an oven, or complicated techniques to prepare a delicious frozen dessert.
With a rich chocolate filling, creamy texture, and crisp outer coating, they’re an irresistible treat for anyone who loves chocolate.
You can customize the sweetness, experiment with different flavors, and prepare a batch ahead of time.
Just remember that flourless doesn’t mean calorie-free, and no-added-sugar doesn’t necessarily mean zero-carb.
Enjoy them as a satisfying dessert, share them with family, and have fun experimenting with your favorite chocolate combinations.
Would you try these creamy homemade chocolate bars? They’re surprisingly easy to make, and the results look absolutely delicious!