When was the last time you completely removed and cleaned your washing machine’s detergent drawer?
For many people, the answer is: almost never.
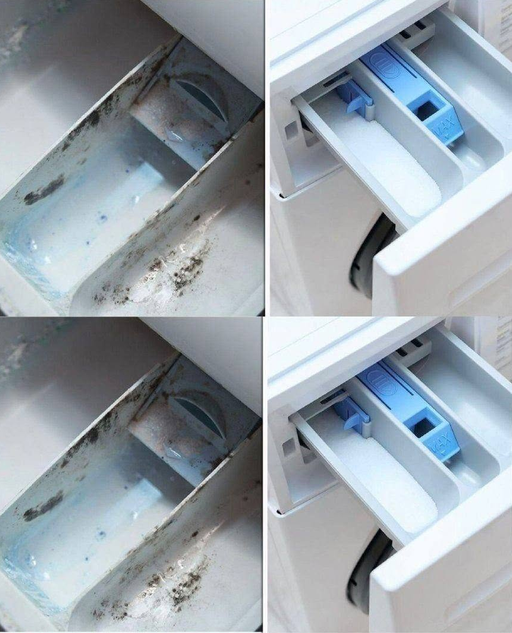
We regularly clean clothes in the washing machine, but it’s easy to forget that the machine itself needs attention. Pull out the detergent dispenser and you may discover sticky detergent residue, fabric-softener buildup, unpleasant odors, or dark patches around the corners and water channels.
Fortunately, cleaning a dirty detergent drawer usually doesn’t require expensive products or complicated techniques.
With a few household supplies and a little scrubbing, you can make a neglected dispenser look dramatically cleaner.
Here’s how to do it safely.
Why Does the Detergent Drawer Get So Dirty?
Every wash cycle sends water through portions of the detergent dispenser.
Ideally, that water carries detergent and fabric softener into the drum.
But small amounts can remain behind.
Over time, residue can accumulate from:
- Liquid detergent
- Fabric softener
- Washing powder
- Hard-water minerals
- Dirt and lint
- Persistent moisture
The combination of residue, moisture, and limited airflow can also create conditions that allow mold or mildew-like growth to develop.
That’s why the drawer may smell unpleasant even when the rest of your washing machine appears clean.
Step 1: Turn Off the Washing Machine
Before cleaning, make sure the machine isn’t running.
For a deeper cleaning where you’ll be reaching into the dispenser housing, switching off and unplugging the appliance is a sensible precaution when practical.
Never disassemble electrical components or pour large amounts of liquid directly inside the machine.
Step 2: Remove the Detergent Drawer
Most washing-machine detergent drawers can be removed completely.
Pull the drawer toward you until it stops.
Many models have a small release tab or button — often located around the fabric-softener compartment.
Press the release while gently pulling the drawer forward.
It should slide out.
Don’t force it.
If the drawer doesn’t release easily, consult your washing machine’s manual because removal mechanisms differ between manufacturers.
Step 3: Separate Removable Components
Once the drawer is out, examine it carefully.
Many dispensers contain removable inserts, particularly inside the fabric-softener or liquid-detergent compartments.
Remove these components if your machine’s instructions allow it.
Taking the drawer apart makes it much easier to clean the narrow channels where detergent residue tends to accumulate.
Step 4: Rinse With Warm Water
Begin with the simplest cleaning method.
Rinse the drawer thoroughly under warm running water.
This can remove a surprising amount of loose detergent and softener residue before you start scrubbing.
Avoid water hot enough to risk warping plastic components.
Step 5: Soak Stubborn Buildup
If the drawer is heavily coated with old detergent, place it in a basin or sink containing warm water.
Add a small amount of ordinary dishwashing liquid.
Allow the removable drawer and compatible plastic inserts to soak for around 15–30 minutes.
The warm water helps soften dried detergent and fabric-softener residue, making it easier to remove.
Step 6: Use an Old Toothbrush
An old toothbrush is one of the most useful tools for this job.
Scrub:
- Corners
- Compartment edges
- Small channels
- Undersides
- Around removable inserts
- Areas where detergent has hardened
A small bottle brush or other non-abrasive cleaning brush can also work well.
Avoid using sharp metal objects that could scratch or damage the plastic.
Step 7: Don’t Forget the Drawer Housing
Cleaning the removable drawer is only half the job.
Look inside the compartment where the drawer normally sits.
You may find detergent residue and dark grime there too.
Use a damp cloth or suitable small brush to gently clean accessible surfaces.
Pay particular attention to the upper area where water enters the dispenser.
However, don’t flood the compartment with cleaning liquid or start dismantling internal components.
If there’s extensive contamination that you cannot safely reach, consult the manufacturer’s instructions or consider professional servicing.
What About Black Mold?
Dark residue inside a constantly damp dispenser may sometimes be mold, although appearance alone doesn’t always establish exactly what the material is.
Whatever it is, visible grime should be removed.
Wear household cleaning gloves if you’re dealing with significant buildup, keep the area ventilated, and avoid aggressively brushing contaminated material in a way that splashes it toward your face.
If you have significant mold contamination, follow your machine manufacturer’s recommended cleaning procedure.
Can You Use White Vinegar?
White vinegar is frequently suggested online for washing-machine cleaning.
However, this requires some caution.
Manufacturers don’t all provide the same recommendations. Repeated use of acidic cleaners may be discouraged for certain components or machines.
For routine cleaning of a removable plastic drawer, warm water and mild dish soap are often enough.
Before using vinegar, bleach, descalers, or specialty chemicals inside any part of the appliance, check the manufacturer’s care instructions for your specific washing machine.
Never Mix Bleach and Vinegar
This point is extremely important.
Never mix chlorine bleach with vinegar or other acidic cleaning products.
The combination can release dangerous chlorine gas.
You should also avoid casually mixing different household cleaners in an attempt to make them “stronger.”
More chemicals do not necessarily mean better cleaning.
When using a cleaning product, follow its label and your appliance manufacturer’s instructions.
Step 8: Rinse Everything Thoroughly
Once the buildup has been removed, rinse the drawer and removable pieces thoroughly with clean water.
Check the small channels again.
Soap or cleaning-product residue left behind can simply create another layer of buildup once the drawer is back in use.
Step 9: Let the Parts Dry
Shake off excess water and wipe the drawer with a clean cloth.
Allowing the components to dry before reassembly is helpful.
While you’re waiting, finish wiping the dispenser housing.
Step 10: Reassemble the Drawer
Replace any removable inserts in their correct positions.
Then slide the detergent drawer back into the machine.
It should move smoothly.
If it doesn’t, don’t force it.
Remove it and check that all inserts are seated correctly.
The Simple Habit That Helps Prevent the Problem
Once you’ve spent time cleaning a filthy detergent drawer, you probably don’t want to do the same deep-cleaning job again a few weeks later.
One useful habit is allowing the dispenser area to dry between washes when your machine’s manufacturer recommends doing so.
After finishing the laundry, leaving the detergent drawer slightly open can improve airflow and allow residual moisture to evaporate.
Likewise, many front-loading washing machines benefit from having the door left ajar between uses, provided this can be done safely in your household.
Always consider children and pets when leaving an appliance door open.
Don’t Use More Detergent Than Necessary
Using extra detergent doesn’t necessarily make clothes cleaner.
In fact, excessive detergent can contribute to residue inside the machine and dispenser.
Follow the detergent manufacturer’s dosing recommendations while considering:
- Load size
- Water hardness
- Soil level
- Detergent concentration
- Washing-machine type
High-efficiency machines in particular are designed to operate with appropriate low-sudsing detergent.
Be Careful With Fabric Softener
Fabric softener can leave particularly noticeable residue because of its formulation.
If you use it, avoid exceeding the maximum-fill line in the dispenser.
Clean the softener compartment periodically, including any removable siphon cap or insert specified in your manual.
A blocked softener compartment may stop dispensing properly.
How Often Should You Clean the Detergent Drawer?
There’s no single schedule that fits every household.
A machine used daily may require attention more frequently than one used once or twice a week.
Instead of waiting until the drawer becomes extremely dirty, inspect it regularly.
If you notice:
Visible residue, unpleasant odors, dark buildup, or detergent remaining after cycles, it’s time to clean it.
A quick rinse and wipe performed regularly is much easier than removing months of hardened buildup.
What If Water Stays in the Drawer?
A small amount of moisture may sometimes remain depending on the machine’s design.
However, if significant amounts of water or detergent consistently remain in the dispenser after every wash, there could be another issue.
Possible problems include blocked dispenser channels, improperly positioned inserts, water-flow problems, or excessive detergent.
Clean the drawer first.
If the problem continues, consult your washing machine’s troubleshooting guide or contact an appliance technician.
What If the Drawer Still Smells After Cleaning?
If you’ve thoroughly cleaned the dispenser but the washing machine still smells bad, the odor may be coming from somewhere else.
Other areas that can accumulate residue include:
- The door gasket on front-loading machines
- The drum
- Filters
- Drainage components
- Areas affected by standing water
Check your owner’s manual for the manufacturer’s recommended maintenance or drum-cleaning cycle.
Don’t randomly combine household chemicals inside the machine.
A Two-Minute Maintenance Habit
A full deep clean may take 20–30 minutes if the dispenser has been neglected.
Maintaining it afterward can take far less time.
Every so often:
Pull the drawer out.
Check for residue.
Rinse accessible removable components.
Wipe away moisture and detergent buildup.
Leave the area able to dry when appropriate.
Those few minutes can prevent the thick grime shown in many dramatic before-and-after cleaning photos.
Quick Cleaning Method
For an ordinary dirty detergent drawer, here’s the entire process in a simple sequence:
- Switch off the washing machine.
- Remove the detergent drawer according to the manual.
- Remove compatible inserts.
- Rinse everything with warm water.
- Soak stubborn residue in warm water with a little mild dish soap.
- Scrub corners and channels with an old toothbrush.
- Wipe the accessible drawer housing.
- Rinse everything thoroughly.
- Allow the parts to dry.
- Reassemble and reinstall the drawer.
That’s it.
You don’t necessarily need an aggressive chemical cleaner to deal with ordinary detergent buildup.
The Bottom Line
The detergent drawer is one of the easiest parts of a washing machine to overlook.
Unfortunately, it’s also an area where moisture, detergent, and fabric-softener residue can accumulate.
Regularly removing and rinsing the drawer can help prevent the thick, unpleasant buildup that develops after months of neglect.
For most routine cleaning, warm water, mild dish soap, a cloth, and an old toothbrush are excellent places to start.
For stronger cleaners, descaling products, bleach, or vinegar, always check the instructions for your particular machine first.
And remember one crucial cleaning rule:
Never mix bleach with vinegar, acids, ammonia, or other household cleaners.
A clean detergent drawer may be a small detail, but it’s an easy step toward keeping your washing machine fresh and properly maintained.